

إعدادات LiteSpeed Cache الجاهزة
طبّق مجموعة إعدادات LSCache مضبوطة سلفًا بنقرة واحدة، واختر مستوى المخاطرة المناسب لموقعك، وتراجع إن عطّلت شيئًا.
الإعدادات الجاهزة (Presets) تطبّق إعدادات LiteSpeed Cache كاملة دفعة واحدة، متدرّجةً من المتحفّظ إلى الجريء. ينطبق على كل الاستضافة المشتركة والموزِّعة، التي تعمل بـ LiteSpeed.
وهي أسرع طريق إلى ذاكرة مضبوطة جيدًا دون المرور بكل تبويب في الإضافة.
طبّق إعدادًا جاهزًا
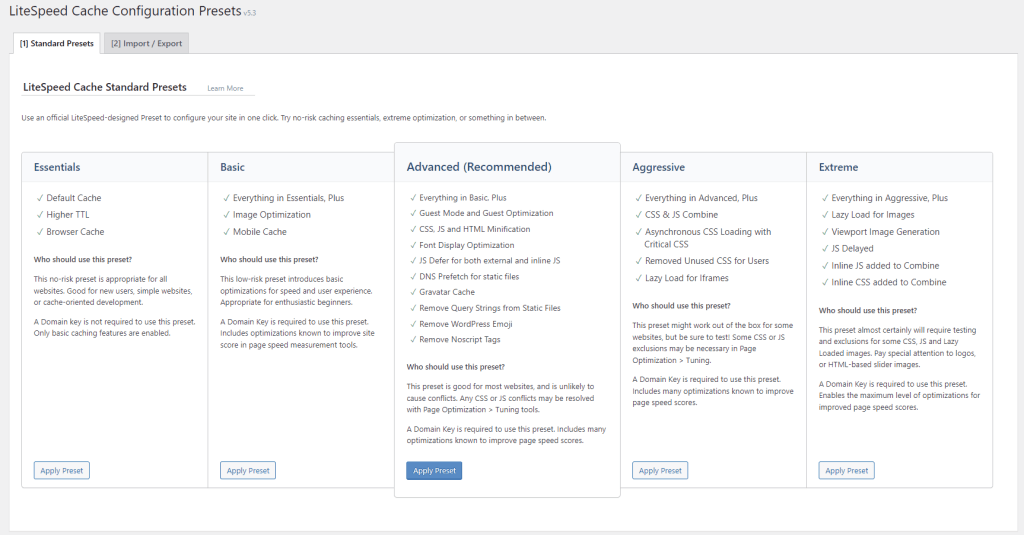
- في ووردبريس، انتقل إلى LiteSpeed Cache ← Presets.
- في تبويب Standard Presets، اختر Apply Preset بجوار ما تريده.
- أكّد عند الطلب.
وتُنسَخ إعداداتك القائمة احتياطيًا تلقائيًا قبل تطبيق الجديدة.
فإن لم تكن Presets في القائمة، فحدّث الإضافة — فهي تحتاج الإصدار 5.3 أو أحدث.
التراجع
كل تطبيق يضيف مدخلًا إلى قسم History في أسفل تبويب Standard Presets، ولكل منه رابط يعود إلى الإعدادات التي سبقته. اختر الرابط فتُستعاد الإعدادات السابقة.
اختر إعدادًا
الإعدادات مرتّبة بحسب مقدار ما قد يسوء.
| الإعداد | يضيف | يناسب |
|---|---|---|
| Essentials | التخزين، ومدة أطول، وذاكرة المتصفح | الجميع. ولا يمكن أن يعطّل تخطيطك |
| Basic | تحسين الصور، وذاكرة للهاتف | معظم المواقع |
| Advanced | مجموعة كبيرة من خصائص تحسين الصفحات | من يقبل استثناء الملفات المتعارضة |
| Aggressive | دمج CSS/JS، وCritical CSS، وUnique CSS | من يرتاح لتشخيص التعارضات |
| Extreme | أقصى تحسين | المستخدمون الخبراء على المواقع البسيطة |
فـ Essentials يفعل ما يهمّ فعلًا — تخزين الصفحات — ولا يمسّ شيئًا قد يغيّر شكل موقعك. وعلى موقع لا تحتمل تعطّله، هذا هو الجواب الصحيح، والفرق بينه وبين الإعدادات الجريئة أصغر بكثير في زمن التحميل الحقيقي منه في درجة سرعة الصفحة.
وBasic يضيف تحسين الصور وذاكرة منفصلة للهاتف. وتحسين الصور خدمة من QUIC.cloud وتحتاج مفتاح نطاق مجانيًا؛ وتطالبك الإضافة به.
وAdvanced وما فوقه يفعّل تحسين الصفحات — تصغير CSS وجافاسكربت ودمجهما. وهنا تتعطّل المواقع.
من Advanced فصاعدًا، توقّع أن تجد ملفات CSS أو جافاسكربت متعارضة وتستثنيها. فهذه الإعدادات لا تفشل بصوت عالٍ؛ بل تنتج تخطيطًا معطّلًا بشكل خفي أو سكربتًا يتوقف بصمت، وغالبًا في قالب واحد فقط. لا تطبّقها على موقع حي لم تختبره.
وAggressive وExtreme يضيفان Critical CSS وUnique CSS، وهما خدمتان من QUIC.cloud قد تترتّب عليهما رسوم. راجع الشروط الحالية قبل تفعيلهما.
أيّها تختار
ابدأ بـ Essentials وتأكّد أن الموقع يُخزَّن. فذلك وحده يعطيك معظم التحسّن المتاح.
وارتقِ مستوى واحدًا في كل مرة، مختبرًا بعد كل منها. وإن أردت تجربة خصائص تحسين الصفحات، ففعّلها على نسخة تجريبية أولًا — فالتراجع سهل، لكن فقط إن لاحظت العطل، وضرر CSS الخفي قد يمرّ أسابيع دون ملاحظة.
ومطاردة درجة سرعة الصفحة ليست نفسها جعل الموقع أسرع للزوار. فمعالجة CSS الجريئة قد ترفع الدرجة بينما تجعل الصفحة تُعرَض متأخرة.
الإعدادات الجاهزة نقطة بداية
يمكنك تغيير أي إعداد مفرد بعد ذلك. فالإعداد الجاهز يضبط خط أساس؛ ولا يقفل شيئًا.
تحقّق
بعد تطبيق أي إعداد:
- حمّل الموقع مسجَّل الخروج وفي نافذة خاصة.
- افحص صفحة من كل نوع — الرئيسية، ومقالة، وأرشيفًا، والسلة والدفع إن كنت تشغّل WooCommerce.
- تأكّد أن التخزين مفعَّل — راجع التأكد من عمل LiteSpeed Cache.
اقرأ أيضًا
مواقع ووردبريس لا تظهر في WordPress Manager
يعدّد WordPress Manager المواقع التي ثبّتها Softaculous فقط. افحص بحثًا عن التثبيتات اليدوية لتضمّ البقية إلى الإدارة.
استخدام صور SVG في ووردبريس
يحجب ووردبريس رفع ملفات SVG افتراضيًا لسبب وجيه. كيف تفعّلها بأمان عبر Safe SVG، ولماذا لا تستخدم إضافة تكتفي بالسماح بالنوع.