

إنشاء حساب موزّع في WHM
أنشئ حساب موزّع في WHM لعميل من خادم VPS أو مخصّص لديك وصول الجذر إليه، وامنحه تسجيل دخول WHM خاصًا به.
أنشئ حساب موزّع كي يستطيع عميل إنشاء حسابات cPanel خاصة به وإدارتها. ينطبق على خوادم VPS والمخصّصة التي فيها WHM بصلاحية الجذر.
والموزّع حساب cPanel بصلاحيات إضافية: فهو يستطيع إنشاء حسابات cPanel خاصة به، ضمن حدود تضبطها أنت.
قبل أن تبدأ
تحتاج WHM بصلاحية الجذر على خادم VPS أو مخصّص. فباقات الموزّعين على الاستضافة المشتركة لا تستطيع إنشاء موزّعين آخرين — إذ يتطلّب ذلك صلاحية الجذر.
وقرّر مسبقًا ما يجوز للموزّع استهلاكه، فستضبطه أثناء الإنشاء: مساحة القرص، والنطاق الترددي، وكم حسابًا يجوز له إنشاؤه.
أنشئ الحساب
-
سجّل الدخول إلى WHM بصلاحية الجذر.
-
ابحث عن Create a New Account — ومربع البحث في الشريط الجانبي أسرع.
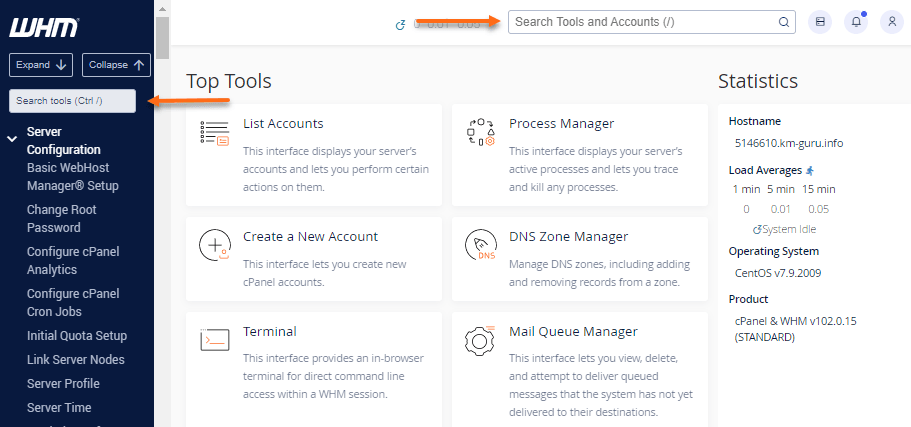
-
اختر Create a New Account ضمن Account Functions.
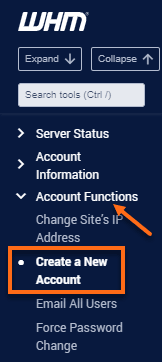
-
املأ النطاق واسم المستخدم وكلمة المرور وبريد التواصل.
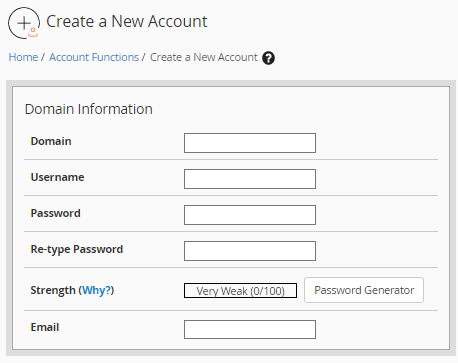
-
ضمن Reseller Settings، علّم Make the account a reseller.
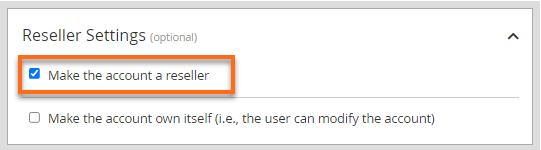
وعلّم كذلك Make the account own itself إن كان ينبغي أن يستطيع الموزّع تعديل حسابه. فبدونه، لا يستطيع تغيير إعداداته إلا الجذر — ما يعني عودة كل تغيير في الحدود إليك.
-
اختر Create.
تأكّد أنه نجح
يستطيع الموزّع الآن تسجيل الدخول على https://theirdomain.com/whm باسم المستخدم
وكلمة المرور اللذين ضبطتهما. اطلب منه تأكيد وصوله إلى WHM وإنشاء حساب تجريبي.
اضبط حدوده
إنشاء الحساب لا يحدّ بنفسه ما يستطيع استخدامه. اضبط ذلك منفصلًا ضمن WHM ← Reseller Center ← Edit Reseller Nameservers and Privileges، واضبط سقوف موارده ضمن Reseller Center ← Reseller Limits.
الموزّع الذي لم تُضبَط حدوده يستطيع إنشاء حسابات حتى تنفد مساحة قرص الخادم. اضبط الحدود قبل تسليم بيانات الاعتماد لا بعدها.